Countryside Decorating |
Painting Contractor | Trinity, Florida
1981
Since
Call (727)271-8165 for all of your cabinet painting, furniture refinishing and painting, stain and varnish wood restoration, interior & exterior painting projects. Serving Trinity, Starkey Ranch, New Port Richey and the surrounding communities.


We focus on simple ideas at Countryside Decorating.
After 40 years our history speaks for itself. Superior craftsmanship, respect for client property, professional appearance and good communication. We provide excellent results and outstanding service for people that choose to hire us.
Clicking on a round icon below will take you to that page where before, during & after project photos and job notes are available.

Interior Painting
Countryside Decorating provides excellent results on a wide variety of interior home aspects. A collection of finished photo examples from past work are on display here.

We focus on creating quality results on brand new doors and older ones in need of a refreshed look.

Wood Staining
We offer a variety of
coating options. These include varying sheen levels, colors availability and will depend on the current condition of the cabinets. Project photos available.
We're dedicated to old school ideas in providing pleasing results on furniture refinishing and painting projects. Each piece has it's own unique history and story. Follow their visual progress in pictures on this page.
We provide the skill
and attention to detail required to create very good results on previously stained wood as well as brand new wood trim that has just been installed. Project costs vary.

We are experienced in the removal of wallpaper and the issues involved in that process.
Pool Deck
Painting
Project costs vary based on deck condition, surface texture, amount of furniture and color.
These surfaces can
be refinished after
sun and weather exposure with
excellent results.

Cabinets

Furniture


Front Door
Painting
Wallpaper Removal Solutions
Window Frame
Painting

Countryside Decorating's
Recent Project Photos
More Wall Repair & Texture Matching in Countryside
As traditional phone jacks in the wall continue to be relegated to no longer in use status, several were demo'd out in this home and then patched. This involves a process in which the old plate is removed, wires snipped and the missing wall area rebuilt. The final steps are matching of the surrounding texture and painting.


Our telephone jack repair kit being put to the test.
"Finished" Result

Being able to provide a reasonable match to surrounding wall texture is always the goal in this type work. A good result like the one seen here can be achieved in the vast majority of plate demo cases.
Painting a Lanai Floor in Countryside
As part of general remodeling work this floor was painted. It was in fair to good condition prior to the work being done and a simple one color scheme using "Natural Concrete" from the chart below was chosen. This product can be tinted to any desired custom color and dries to a low to mid-level sheen. It does a great job on pool decks, patios and lanai's.


Before.
TropiCrete from Florida Paints.


Coat one about to go on.
A work in progress.

There were a small number of stress cracks in this floor from old age. These were all treated over the course of a few days as other work took place. This type crack repair is generally a cost effective improvement on the original issue but is not a perfect solution to what can be a subjective issue for homeowners.

Our patching material.
Creating a resonable texture match is our goal.


Three or four coats are sometimes needed when beginning from a color pattern like this one.
A Wall Repair in Countryside
This garage had several areas of mild to moderate wall damage that needed to be repaired and then re-textured to match the surrounding area walls. This photo series illustrates the old fashioned way of doing it. No spray cans or texture hopper just drywall mud, a 10" knife and a big sponge is all that was needed. Experience also helped.


Getting the right amount of material on the wall is a key factor.
A sponge is used to raise the mud surface so it can be "knocked down".

The knife is then drawn over the material while still wet at an angle in order to create the texture pattern seen above. The outer edges of this patch will get some minor sanding to improve the border prior to getting painted.
A Wood Putty Repair Kit in Trinity
This little fixer-upper packet was put together for a large area of mixed coloration wood in a flooring situation. A wide variety of color outcomes can be made up thru the mixing of these putties. A second packet was also made up to create a total working number of about ten or eleven browns, grays & blacks.

The Color Putty brand goes back to the 1960's
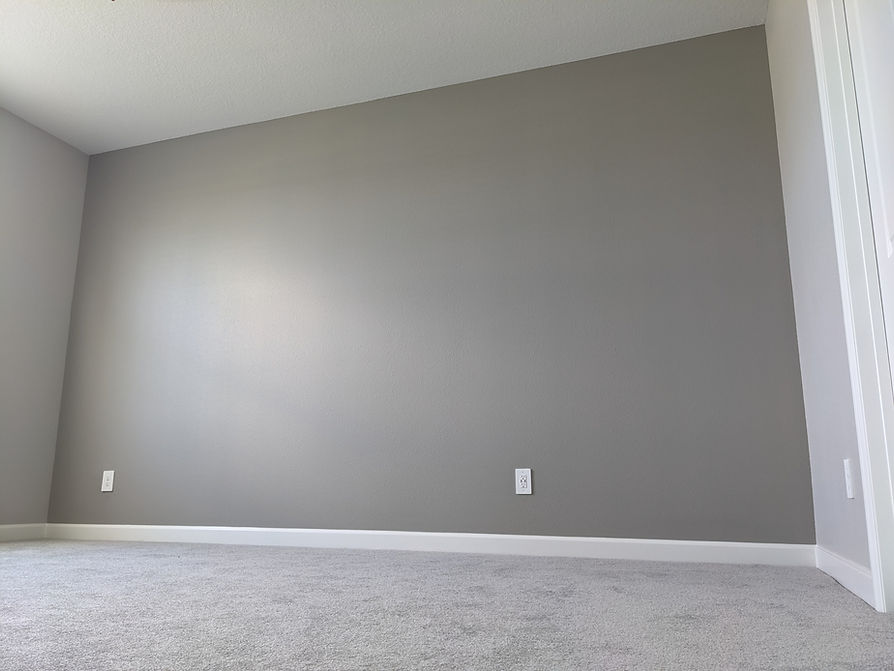
Bedroom Reset in Countryside
The owners here have made the decision to completely refresh two bedrooms in this older home prior to a property sale. The carpet pad in both rooms had more or less begun to disintegrate into powder as seen in one of the photos below. All furniture was either donated or discarded due to poorer condition. The trim here was done in white semi-gloss to brighten the overall interior feel rather than stay with the darker natural wood finish and an off white with some warm undertones was chosen for the walls.


Pictures are worth more than a thousand words on larger remodels
Finished Result

The wall color here was custom mixed on site based on both the new carpet's coloration and the white trim. Eggshell sheen.
Spraying Ceilings in Countryside
You know you've been around a while as a contractor when you have a rainbow of color in your drop cloth "collection". In this particular situation we've gone with lighter weight sheets on several items to protect the property in this vacant but furnished home.

Covering everything in this room took about 15 minutes.
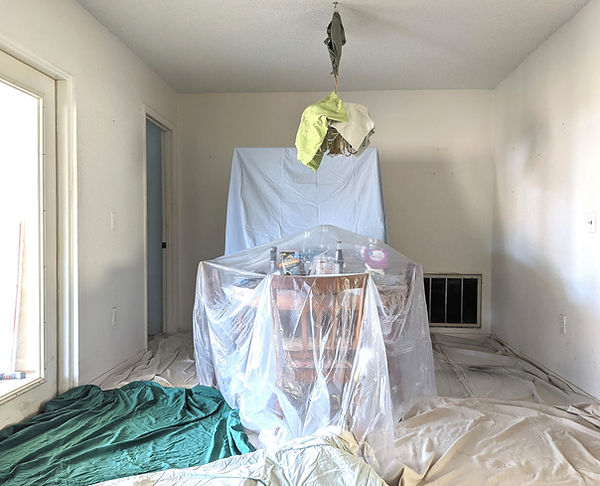
A similar amount of time was needed here too.
Good Trim Intentions in Countryside
When waterborne trim paint is put over oil it's a recipe for disaster. Here we have a minor snow flurry of various bits and particles of wrong coating, wrong place, wrong everything flying in the air as this water based coating is sanded out of the way. The only way out of these scenarios is sanding back to a sound surface. This is usually not difficult with the right grit sandpaper and some effort. The previous homeowner here was likely in a hurry, ill informed on proper prep requirements, used a poor quality paint or all of the above! This is from recent interior trim work from the Countryside area of Pinellas County.

Painting New Fascia Wood in East Lake Woodlands
This property recently had several sections of fascia replaced due to weather damage from old age. Our responsibility was to prep these areas for painting using a superior caulk product rated for this type work. Once that was done, the fascia was primed and painted to match the existing brown on the other wood trim. Satin sheen.


Two long extension ladders were brought to this property based on the difficult terrain and overall soffit height. Dynaflex Ultra in dark brown was used to caulk this wood.

All done with this exterior trim repaint.
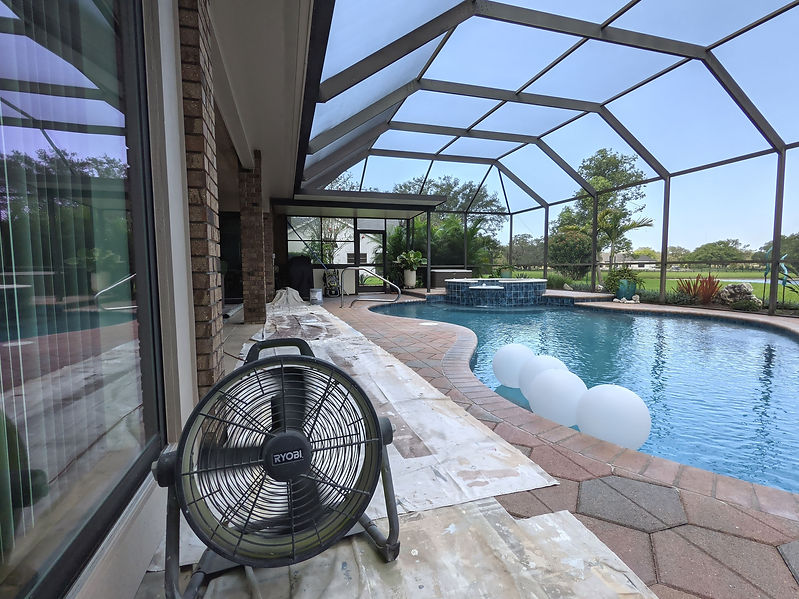
Hand Rail Painting in Trinity
Three hand rails in this master bath got repainted to match the existing wall color.


As these railings would not dismount a decision was made to finish them in position which required the masking work seen here.


A very small fine finishing tip and low pressure were then combined to do this work which kept overspray to a minimum.


Moving some air with the homeowner's mini fan as we wait for this rail to dry prior to removing the final paper areas.

Satin sheen was used.
Metal Building Painting in New Port Richey

This building was completely repainted from top to bottom with only minor changes to the existing color scheme. The blue trim accent across the top was eliminated and the four bollards were redone in a red to match the lettering in the sign.
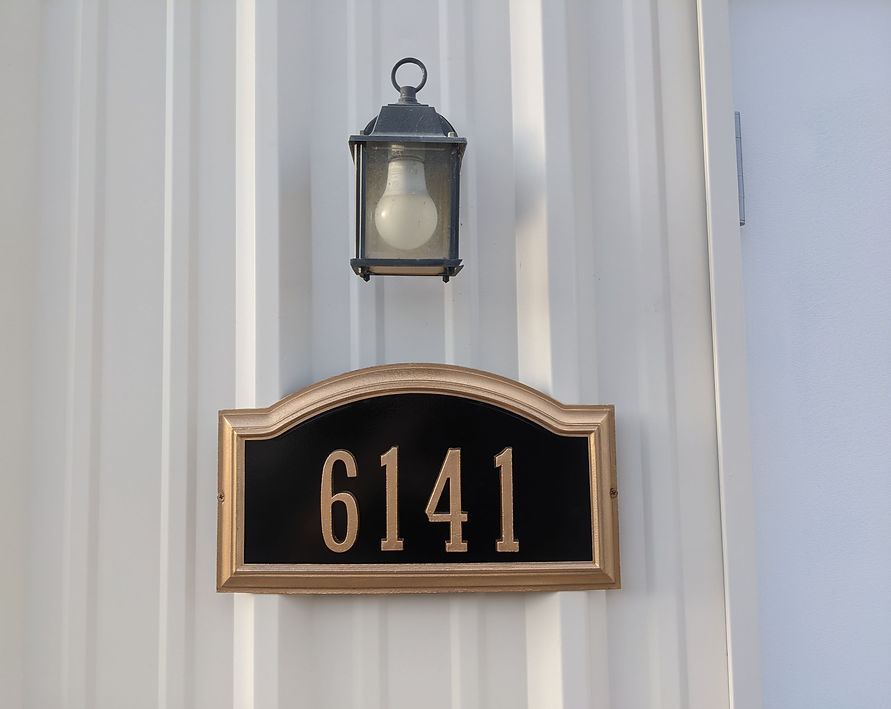
The address plaque adjacent to the main office door opening was also completely refinished using black for the background and gilded gold paint everywhere else.

Not quite candy apple red for these bollards but close enough. Semi-gloss sheen.

For those admiring the main color on this project, it's called Sedona and comes from Florida Paints. Satin sheen.
Metal Building Painting in New Port Richey

The pressure washing crew getting the building's surface cleaned up.


The yellow columns on the left have been stripped almost in their entirety by using a rotary tip. In the right hand picture above, a clear line is visible where the old coating residue has been washed out of the way in readiness for repainting this building.
Interior Painting in Trinity

This photo from past work displays furniture refinishing in the form of the drop-leaf table, wallpaper removal work which took place on the surrounding wall areas next to the table and of course interior painting. This wall color was custom mixed for the homeowners.
Metal Building Painting in New Port Richey
In these before photos we see an upcoming project prior to the pressure washing taking place. There is a fair amount of mold & mildew growth on the north side but overall it is mild in severity. A smaller gas powered hydraulic lift will be used to simplify the work based on this building's height and the water runoff depressions on two sides.


All of the peripheral items seen here will be moved to facilitate lift access.

The two depressions can be seen clearly in this wide angle photo.
Sunroom in Clearwater
In what was certainly one of the worst nicotine damage repainting projects we've seen, our lanai has finished up with a brand new outlook on life. The ceiling and wall areas here were both painted using a color called "Napery".


Cleaning solution running down over the mural as we get the walls ready and the beginnings of progress on getting the new wall color put on.

An off white was used on the door opening trim.

Looking west out into the backyard.

A final look at this sunroom...
Nicotine Damage Ceiling Repair in Clearwater
This final series of photos finds our ceiling completing it's journey from smoked out oblivion to looking good again. After some overall sanding across the entire area, the mudding & taping work has commenced in the very first photo below.

Rebuilding a ceiling is a process that requires patience.


Several passes with mud are necessary in these cases. The above photo on the right shows what coat two of mud looks like going on.
Finished Result

Going from the textured mess the old ceiling presented over to the smooth appearance seen here took place over the course of several days.
Nicotine Damage Lanai Ceiling Repair in Clearwater
This area is going to be repaired and then repainted based on the long term damage from smoking evidenced in these photos. Chief among the necessary repairs is the ceiling. In another very good example of why close visual inspection of surfaces is critical in many instances, this older popcorn type ceiling was eventually removed entirely. That wasn't strictly necessary from the nicotine itself, but was eventually made clear from the very small area of delaminating popcorn outlined in red below that grew into a full removal .

The beginning.


This texture looked like it was adhering but in fact was not. The large pieces hanging down indicate how easy a sharp blade has separated it from the actual board itself.
In the above left photo, we've steadily built up a nice supply of rather large flakes and old material on the drop cloths below. The brown paper visible in the right photo displays how areas of drywall mud provided better grip for the texture and therefore took the top layer of lighter colored paper off with it during the removal process.
A closeup of our ceiling surface and problem solver in a can surrounded by paint flakes.

Looking upwards we can see the drywall board sections clearly outlined. There are a couple joint areas in more severe condition. A solvent based primer was used to create a solid starting point to begin rebuilding this ceiling.
Interior painting & wall repair in Palm Harbor
Based on water damage from a small pipe leak in the wall seen in the first photo we installed a fresh piece of drywall, provided a solid match to the existing wall texture and then followed that with painting the walls in this office, an adjacent hall and the front entry lobby "Agreeable Gray".


Patching a wall like this will typically take at least two or three rounds of drywall mud work followed by the texturing in order to provide a good result.

ScrubMaster from Florida Paints. "Agreeable Gray" walls. White on the trim.
Spraying liquid mask on french doors
For more information on the masking process and before and after photos visit our french door painting page.

Pool Deck Mural in Safety Harbor
In working with all of the homeowners and businesses that we have over the years there have been some memorable sights to be seen. This photo is being posted here as something that was a pleasure to have come in contact with. It's from an exterior project done late in 2025. The owners had it commissioned based on one having grown up in and around the Florida Keys.

Key West Mural. Safety Harbor
Front Entry Door in New Port Richey
This door was done using an HVLP sprayer. The area at right with the brown paper is a small test section set up in this case to confirm that our spray fan looked good before starting. This photo was taken moments after finishing coat one.
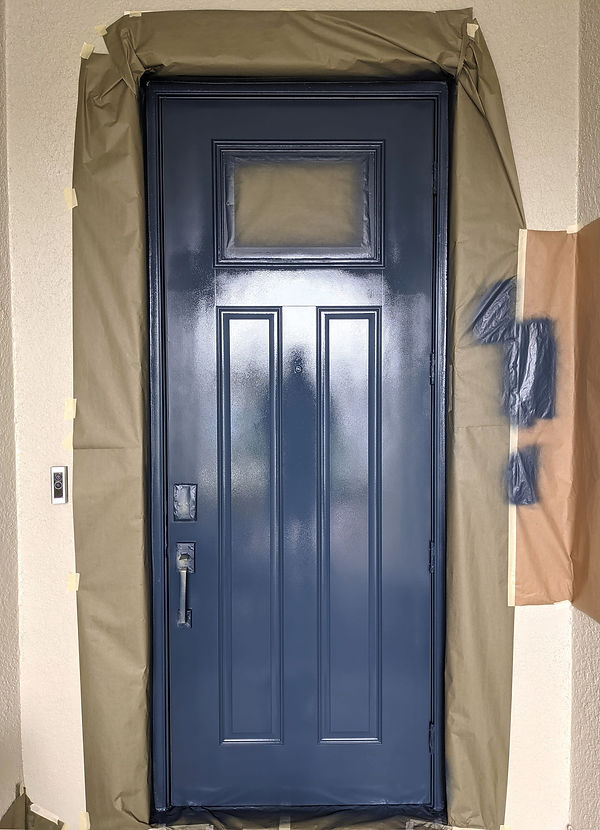
Color is "Gale Force".
The fully dry appearance. Photo taken the following day.

Finished Photo.
Cabinet Painting Assembly Line
One of the doors from this project takes up most of the foreground in this picture while a dozen drawers fill in the background. Being able to keep things organized throughout the entire process of painting cabinets is one of the major reasons some contractors cannot produce good outcomes for their clientele when they attempt to do cabinet work. While speed is an important aspect overall, it will very rarely be the number one priority for homeowners when considering the expense involved in a major cabinet project.

Cabinet painting in Trinity.
Pressure Washing
Refreshing a driveway.


Sidewalks & parking lots.


Brick Pathway

A few cabinet painting photos from past projects

Gemini's Evo Eclipse product was used on these doors & drawers.
Wall and trim paints are not rated for this type work.

Our HVLP sprayer is seen here taking a break after misting on a
couple coats of white shellac to a small set of bar cabinets.

Wearing a mask may not look cool but it's a wise precaution.
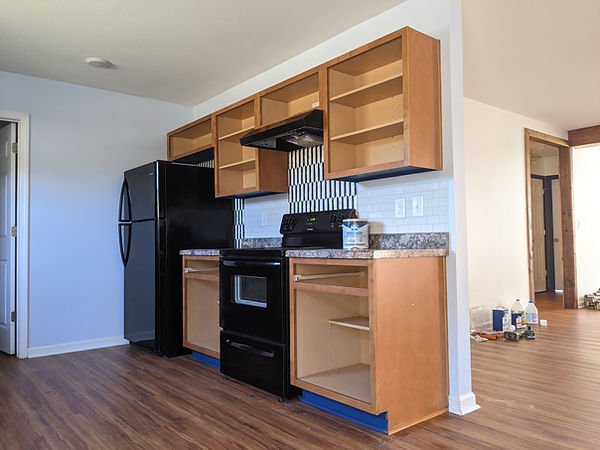
Kitchen Cabinets Restoration
This set was done with several additional things in mind as the overall process took place. New granite countertops were going to be coming in, a fine wood veneer was to be put in over the top of the old checkerboard type backsplash material at the range and fridge areas and finally, both of those two older black appliances themselves will be getting replaced. Timing is everything as has always been said and in contracting it can alter many different project scope factors. Our final "finished" photo of this kitchen can be seen with boxes stacked hither and yon as a move-in takes place in peripheral areas of the home.


The cabinet finish was put on post countertop install here. A few more hours of masking work were then needed to ensure that everything was ready to spray the final coat.


Working late laying out the doors and drawers prior to putting everything back.

It's all back in place as moving boxes begin to take over. These cabinets were done in the color SW9544 "Dashing". Satin sheen.
Kitchen Cabinets Restoration
The old blue finish we see here hanging by a proverbial thread during the stripping process was not cabinet grade material. Enough said. The two small scratch marks seen in the 3rd photo further below from the very first post on this cabinet set were a good tip off to what was ahead on this project. Those couple spots of missing material occurred during a standard check to the existing coating as to what this project was gonna involve overall from a degree of difficulty standpoint. These sorts of in person/on-site reviews of the actual cabinets and their condition are critical to determining how to proceed & what to use. Discussing things over the phone is simply not enough.


The boxes were stripped in place. All the doors and drawers were handled in a "removal station" that was created in the hall bath.
Further along in the process...The boxes are all stripped, wiped down, given some preliminary sanding and then masked off for the primer.

A solvent based primer was used in this case to get things started in rebuilding this set.
A couple close up views taken during sanding show the powdered sugar like results that were created.


Ask any finisher if they like primers that sand to a nice powder and most will say yes.
Getting ready to put the first coat on. The small bucket between the paint and the cup gun sprayer is our refill department in case the initial amount needs topping off.

HVLP spray equipment like the cup gun seen here has earned it's place in the painting industry.
Kitchen Cabinets Restoration
Counting up all the doors, drawers and the one false front at the sink, there are 28 openings in this set. Each of the images below can be clicked or tapped on to enlarge the photo. It was done in the past by hand with both a brush and what was likely a small four inch roller for reasons that may not ever be known. The brush and roller marks left behind on the various doors and cabinet box surfaces throughout this kitchen indicate that a prior homeowner may have done this work. The overall result, while certainly not at a professional level, is far from a total disaster. The unfortunate mistake made here however was in choosing the wrong type coating to use in painting these cabinets. More to come from this project with photos and videos explaining what's taking place and why it's being done.


This kitchen set currently has the blues, but not for much longer...


Some issues noted during the preliminaries & marking the hardware.
Painting a Garage Floor
Getting ready to start the prep in the first photo below and then in the 2nd it's halfway to dry with a few patches here and there showing as darker because they're still wet.


Prep is where the real work takes place.
EnduraTread from Richard's Paint was used as the finish.
A small amount of grit was added for slip and fall prevention.


This product can go directly onto older concrete.
Final Result
Two coats later, this garage floor is done. The color chosen was "Natural Concrete". Walls & ceiling were done using white satin.

This two car garage is ready for vehicle traffic and storage.
Kitchen & Island Walls Painting
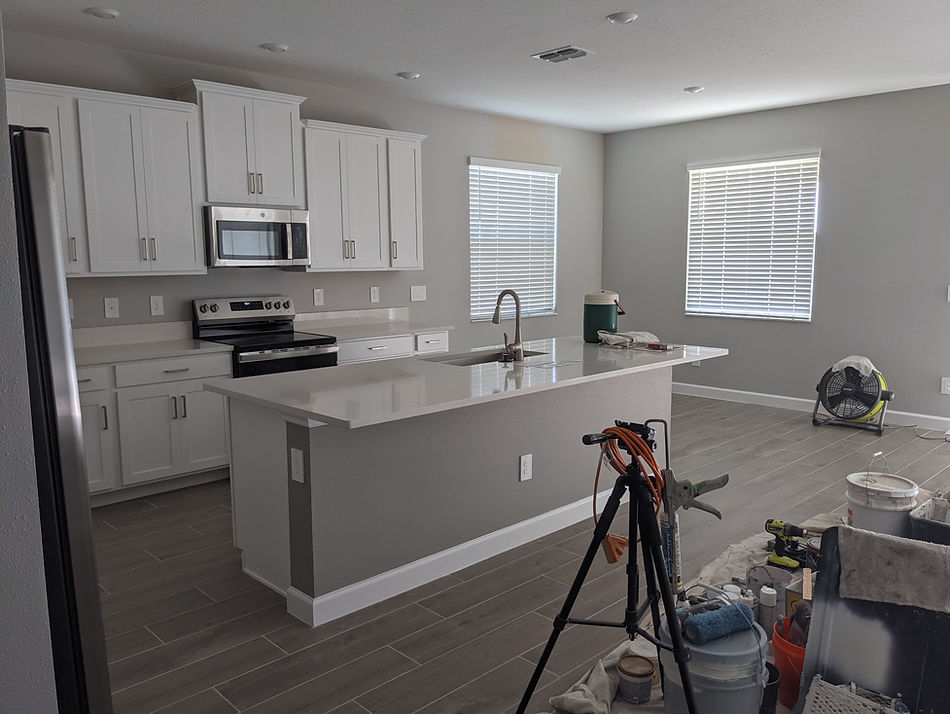
Interior painting. New Port Richey.
Our before photo from a couple weeks ago.
Evolution of a Remodel
This room in a former life had been an office with it's own refrigerated wine cooler built into the wall seen here. The current owners removed the wine aspect due to it's older condition as well as to create a larger space. After a couple years as a sitting room however, a closet is now being added back into the mix in order to make a proper 3rd bedroom.


The framing for the new walls is up and running in the first image. Drywall board and the associated mud work is nearly complete in the second.
the Evolution of a Remodel Continued...


The mud work is done.
Checking baseboard length.

About to fire up the nail gun on the trim install.
Final Results

The closet's trim was matched to the existing trim color and sheen already in the rest of the room. The wall color is "Colony Buff". Eggshell sheen.

Our two bi-fold doors, which were seen earlier in a spray video further down this page, are now back in place and the work is done.
"The Best Part of Waking Up..."
Putting together a cup of Folger's instant out in the field early one morning on this interior. Another shot under that of a classic lunch for many contractors over the years.

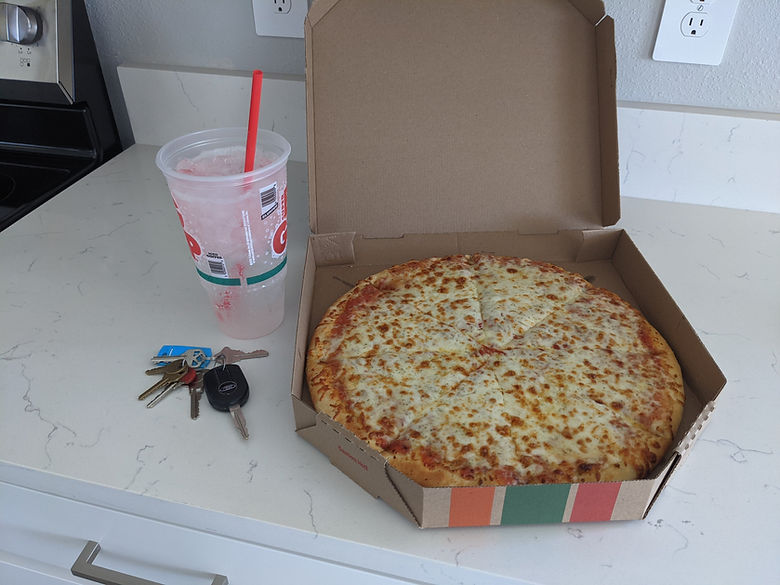
Sprite and Pizza. The cornerstones of every nutritious meal.
ScrubMaster from Florida Paints
Using the best materials never gets old. At the recently completed interior in New Port Corners the majority of the walls were done in eggshell. The baths & the kitchen got satin. To view finished project photos visit our interior painting page.

Eggshell & Satin. The two most commonly used sheens for interior walls.
Master Suite Accent Wall
The main color in this bedroom will be "Nimbus" BM1465 with the accent wall getting "Dorian Gray" SW7017. Before photo above and finished photo below. Eggshell sheen.
Before photo.
"Dorian Gray" Accent Wall. Eggshell sheen. New Port Richey.
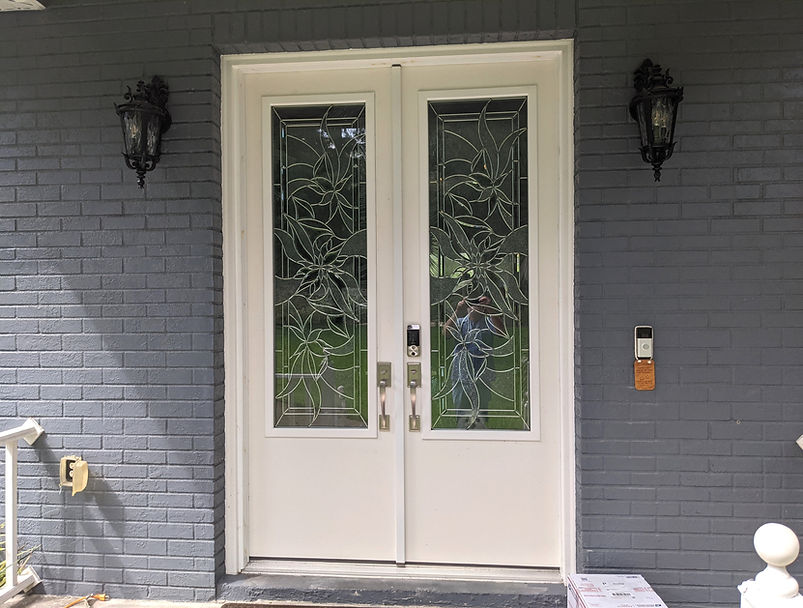
Painting Brand New Front Entry Doors
In this before photo, the "photographer" is just visible in the reflection of the right hand side door's fine glass insert.
This opening will be done in black & white. To learn more and see several before and after photos of different front entry scenarios visit our front door painting page.
.jpg)
Aquatra was used as a bonding coat and is a superior primer for this type application made locally by Florida Paints.
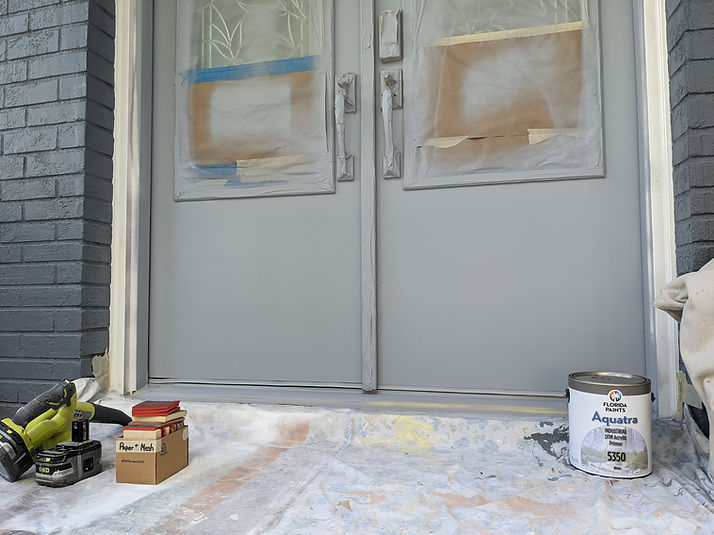
PPG's Break-Through in "Wrought Iron Black" was used for the doors finish. This product's reputation in the painting industry is well earned as an excellent all around coating.
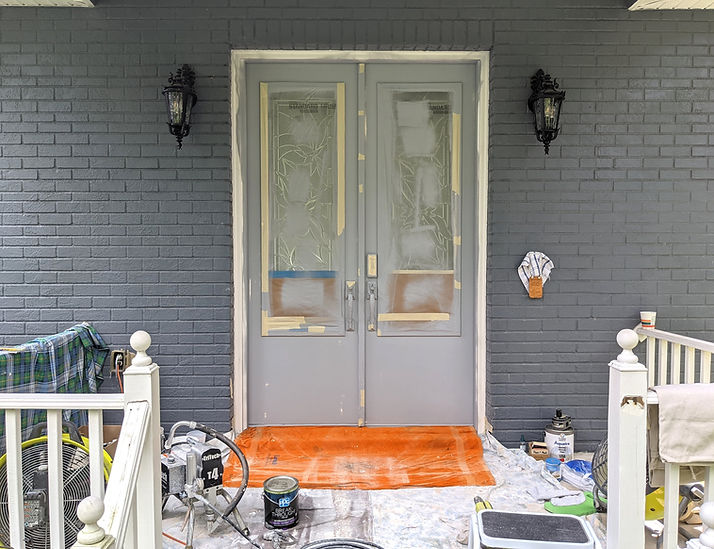
Finished Appearance
Black doors/ White trim. Semi-gloss sheen.
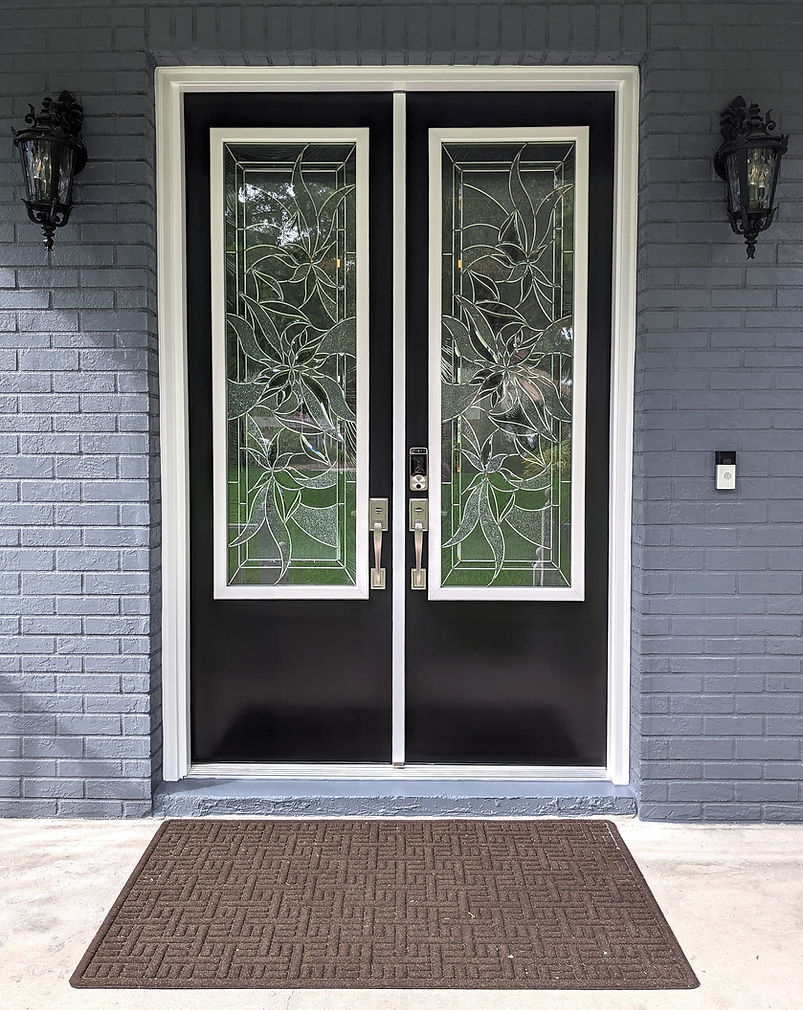
Front Entry Doors Painting.
Soffit & Fascia
This work involved the application of a mild cleaning solution applied via bug sprayer first, followed by pressure washing of the surface areas. Everything was then given an overnight dry. The painting was done by hand with a brush and roller the next morning. The fan was for the operator doing the work.
Trinity. Exterior painting.
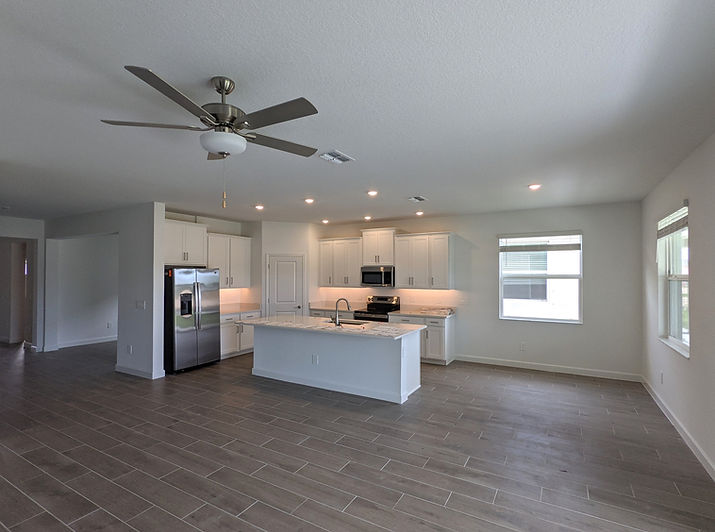
Upcoming Interior Photo
We were hired by homeowners at this new build in the Estates section of New Port Corners to have the majority of the walls painted after they take ownership. The main wall areas in this photo will be done in "Nimbus" BM1465, with the kitchen island getting "Dorian Gray" SW7017. Both of these earth tones will coordinate well with the flooring at this property.
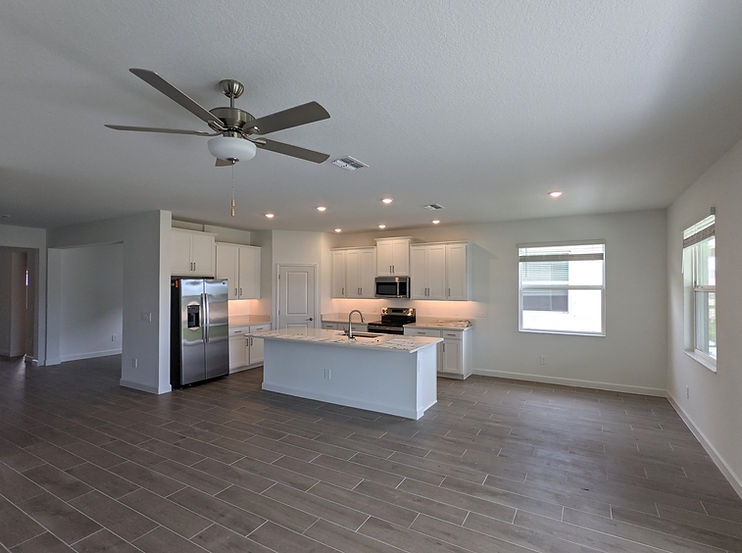
New Port Richey. Interior painting.
Spray painting roof vents
Several of these small items on this roof in the Cypress Run neighborhood were all getting unified in appearance while getting a protective coat of enamel at the same time during this exterior painting project. Aerosol spray cans were used.
An interesting anecdote on these little cans of paint is the names that painters have for them across different regions of the state and country. If one should ever find themselves around painters and overhear them mention using a spray "bomb" on something, they are referring to these simple cans of spray paint, not an explosive device that they have somehow improvised to accomplish a difficult task. Another fairly common term for them is "rattle can".


These vents were all wiped down with a damp rag containing a mild cleaning solution followed by a clean dry rag to remove any remaining residue. Most were still what was very likely their original coloration.

The homeowners here made the decision to go with a dark grey to blend in with both the overall shingles appearance and the dark trim on the chimney cap.
Spraying primer on bi-fold doors
An upcoming bedroom remodel in the Trinity area will be getting a new closet added and as part of that work we are getting two bi-folds primed and painted so they will be ready to install.


Getting ready to apply primer to our new bifold doors on the left and then a good visual of maintaining the proper angle and spraying distance in the video clip on the right. Shown at about 1/2 speed in order to best illustrate how those two things working together provide a smooth application of the proper amount.
Putting some pizazz in an old pine vanity
Along with repairing several missing areas of the original
clear coat material in between the soap dish and sink and next to the liquid soap dispenser, it was also desired that this vanity top get a little more pep in it's step appearance wise too. A mid to somewhat higher level sheen was chosen for the new clear coat once the overall cabinet refinishing work was completed.

A before photo from the estimate visit of this vanity top.

Post refinishing work appearance.
Mixing Shellac Flakes
As a potential color match solution on a small test piece of furniture, this batch of "Blond" is about halfway to working consistency at this point. The photo was illuminated in this case by a small flashlight in order to show the interesting nature of this coating and it's appearance when mixed in house and not purchasing it ready made from a supplier.

It may look pretty cool in the dark , but it's also
a super sticky mess in the form seen here.
Fixing a Stuck Drawer in 60 Seconds
This drawer wanted to stick in position rather than moving smoothly in and out so as part of the cabinet refinishing work it's getting the offending edge sanded down.

Surfprep sander making short work of some excess material.
Hall Bath Vanity Cabinets
This older vanity was probably installed circa the mid 1980's or early 90's and has suffered many minor surface dings and other appearance issues over the years. Chief among the latter is a general deterioration of the original clear coat that can sometimes appear as a washed out looking surface with very little sheen left to it.

Before photo taken during the estimate visit.


Some of the issues that will be corrected and refreshed can be seen in the above left photo along the front facing edge.
Cabinet Painting Sample
Satin sheen. Untinted white

The before and after example seen here was taken from a kitchen cabinet "junk" drawer. Satin produces a very nice mid level sheen.
Dresser Refinishing

Having the right tools and knowing when to use them in refinishing work is more than half the battle.
Upcoming Master Bath Cabinet Sets in Trinity
(Painting His & Her Vanities)


The two vanities in this bath got slightly different designs back in the day. One less drawer and a couple of additional doors are on offer in the one not pictured. The new color will be a midtone that'll serve as a fine accent to the tile floor. Along with painting these cabinets, the majority of this bath will be getting remodeled in the process.
Preliminary Sheen Samples
Upcoming work will involve painting both sides of a
newly installed front entry doors opening. The exterior side's color will be black. These were created to assist the decision making process for the sheen choice.

If your contractor isn't willing to create samples for you, it may be time to consider going a different direction regarding who does the work, especially when considering the financial investment some home projects require.
Stain & Varnish Doors Restoration
After discussing things with the homeowner here a decision was made not to dismount them for transport offsite for stripping and rebuilding of the finish. In the first photo below we are getting ready to "wash" these old doors as a first step in preparation for bringing them back to life.

We have made very good use of donated towels, sheets and other linens over the years, as seen in this entry opening.
Many different appearance issues have occurred over the course of time in the forty years since these were originally installed. There is also an interesting contrast between these two doors with regard to their respective grain patterns.


Refinishing stain & varnish issues is an art form.
At times, this often requires trial and error along the way.
In this photo taken from a bench nearby, both doors are already showing some marked improvement in their appearance after the prep process despite the extreme viewing angle. The warmth of the old look is coming back.

Box fans come in handy for many things in the painting industry including cooling off the contractor on warmer days.
Finished Photo
Clear satin was applied after the restoration work was completed.

An excellent result overall considering they were done in position.
More Cabinet Painting Samples
These are a mix of both satin and semi-gloss sheen's. The drawer front in the foreground was left with a small section of it's original finish to illustrate it's before and after appearance in this particular case. Visit Countryside Decorating's cabinet painting page to review before, during and after project photo's. Basic costs and general coating spec. information have also been provided there for our visitors.

Periodically working with different colors, types of wood and various finishing materials is like going to school for a contractor.
Honey Oak Cabinet Sample
This door was done using leftover material from a
master bath cabinet set. The sheen is semi-gloss.


Oak's open grain is quite clear in the second photo.
Front Entry Doors
Before & after pics on some vintage doors.
New color here is called "Wood Ash".

After

"Legacy" Exterior Satin from Florida Paints was used on this home. It's their best and was created specifically for our tough weather conditions.
Palm Harbor Exterior
Rear lanai work getting done at various different points while a few rain showers came down last week. Good planning cannot foresee everything that may come up on painting projects but it does help allow for adjusting on the fly and being able to continue the work in some cases. The new body color here is called "Norwegian Blue".


A couple of before & after's taken once the work was underway, arranged underneath an initial photo that was taken back during the estimate visit.
Rebuilding the Master Suite
The walls in this area were the most severe of the four rooms done. After the paper removal work, some extensive rebuilding and repairing via drywall mud was required. That story and a few finishing photos of the ceiling, trim and walls are included below.


Using proper equipment to complete work goes to both job site efficiency and the overall quality of the outcome. Airless sprayers, a shop vac and a mini rolling scaffold can all be major players at various points on many projects.
Drywall Repairs Aspect


The level of repair work sometimes needed to recreate a proper wall appearance post wallpaper removal and the amount of equipment involved to keep it going smoothly can both be extensive.

Naming every item and tool in this shot would take a few minutes...

Break-Through may be the best all around trim coating there is.

Next stop for these two french doors is getting the masking material trimmed back off.
A Concrete Slab's Evolution on "Film"
Our story here begins with this side garage door slab acting as a temporary storage location for landscaping shell at this circa mid-80's exterior. As the work proceeded on the main house this slab was also getting worked on.
(click on the image below to watch this 30 second video)

Several individual frames were combined to create this time lapse video clip.
More Wallpaper Removal Repairs
In these initial photos from the master suite work, the wallpaper and the border seen in the before shot below are being removed in favor of having the walls painted.
Before

The Removal


The homeowners at this location did a great job on the removal work.
Wallpaper Removal Repairs
The paper and chair rail seen in the before photo below were both removed in this bedroom. All the resulting peripheral wall damage was then repaired. The new color is "Lotus Flower" SW6310. Sheen is satin.
Before

Getting Started


Mixing up Some Primer

Repairing Walls from Chair Rail Demo


The drywall mud needed for these repairs was fairly
substantial and it did require more than one pass.
Finished Result

Matching the surrounding wall texture and "hiding" where an old chair rail had once been is not as easy as it looks on YouTube videos.
Helene Damage Remodel
The walls at this location have suffered severe flooding damage and were demo'd up to about the 2-3 foot mark. The floors have already been completely replaced in these four photos of the master bedroom, taken from the estimate visit. The homeowners have decided to go with a different color scheme during the rebuilding process and have chosen SW 6224 "Mountain Air" for the walls.


The chair rail's been finished in white semi-gloss and the wall color's begun making it's appearance in these 2 photos.


Finished Result

"Mountain Air" SW6224 walls. White semi-gloss trim.
Windows Metal Refinishing
Years of sun and weather have taken their toll. These before and after photos are being posted here in order to reflect the type of visual improvement possible in these type cases.

Exposure and what may be mineral content in the water from a sprinkler system have contributed to batter this window metal into submission over time.

Windows can be brought back to excellent condition again through skilled workmanship, as seen in this after photo, without the need for replacing them.
Garage Closets Reset
Both of these areas appear to have sustained water damage at various points in the past. From the old hot water heater in the left side closet and from the washer in the right side.
Water Heater/Sink Side
Laundry Side


Two garage closets at this newly purchased home are getting "remodeled".
Finished Photos


After some drywall repair related tlc arising from the various removal issues, these two closets are ready for their new life to begin for this homeowner.
Exterior Before's
These photos show an older home's condition prior to refreshing the existing color scheme and washing both the driveway and the side entry area's fencing and slab.


Several things here have seen Mother Nature take hold and begin reclaiming surface areas.
After Photo's

Pressure washing the driveway did wonders
for this home's overall appearance.

The fencing has also cleaned up well after
having been pressure washed.
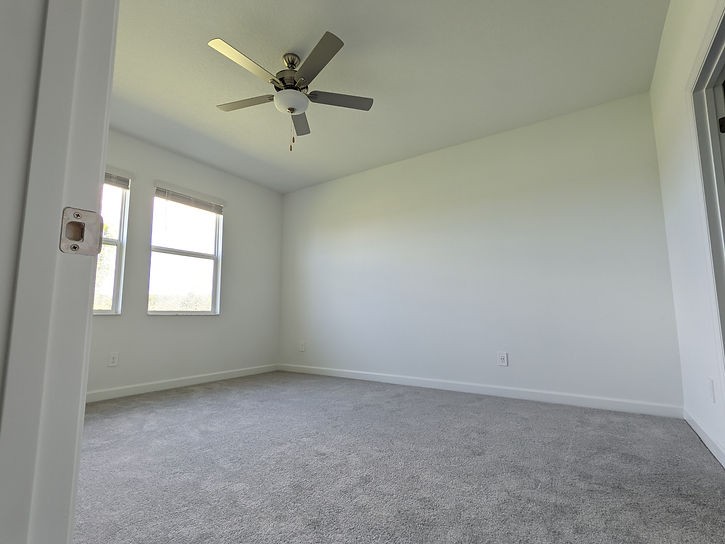
Interior Painting
The new wall color for this bedroom is
"White Heron" from Benjamin Moore.

Working our way across the headboard wall.
"A classic bright white with the slightest cool cast."

Finished photo of this bedroom after all painting work was completed.
Bedroom Remodel
This area may have originally been an office with a small side bar in it but after some consideration, the homeowners here have made several changes in creating another bedroom. Among them are new flooring, demo'ing out of the side bar's cabinets and adding organizer shelving in the closet space.


The small bar cabinet set on the left is on it's way out, as we bring work gear and equipment in.


The cabinet set is history and closet organizer's have also been installed.
_edited.jpg)

Important note from the homeowner.
Starting to look like a remodeled room.

A custom color for this room's walls was created from a wall color elsewhere in the home.
Custom Finish on Tongue & Groove Ceiling
The homeowners here have replaced an older lanai ceiling that had originally been done with drywall. The prior ceiling had been patched several different times and was in poor condition overall. After discussing various different looks with them and creating several samples, a white look was decided upon. A four inch brush was used in order to achieve the final result. The goal here was adding a fine and beautiful accent to the ceiling without burying the woods natural appearance.


A newly installed cedar ceiling awaits finishing work.


Several "White's" were compared before settling on the one used to do the work.


Some truly beautiful whitewashed results are almost compete on this ceiling.
Finished Result

Sweeping up just prior to putting everything back in place.
Fireplace Wall Remodel
These photos represent the general progression which has taken place. The very first picture depicts this wall in it's original form prior to the work truly starting.


Just about every aspect of this wall will be getting worked on.


The bar top's initial color work and getting transported for finishing.


New drywall was installed and the fireplace's interior was done in black.


A "Whitewash" was created and put on the fireplace's bricks.

Progress photo showing one of the repainted doors sitting on the shelves.

The cabinet doors will soon be back on and a backsplash will also be getting installed.
Final Result
